Sunday 31 May 2015

We Love Crochet!

I hope everyone had a lovely bank holiday weekend. I had my in-laws staying over the weekend and as the sun was shining we went for a walk around Wythenshaw park and the flowers were out in full bloom, beautiful.


My mother-in-law brought  a vase with her which she wanted to cover in crochet, so my weekend was full of cooking, wine and crochet.
I was using a linen yarn as she wanted a natural look as the vase is going in her bathroom. I started with a foundation chain around the bottom and started working my way up.


I used double trebles in a cluster of 4 and increased gradually as I made my way up the vase.


I did get it finished over the weekend and I think it looks great. If anyone is thinking of covering a vase let me tell you, its easy but just choose your vase or basket carefully and keep the shape simple so you don't have to do much shaping.


Well Helen you have inspired me to have a go at doing something like this, however I have started  on a smaller scale and I would like to share my little project and instructions with everyone. I am using an old Crème brûlée jar from Marks and Spencer. The jar can be any you like I like the short ones for tea lights. 
 I used an old dessert pot


Tea Light Holder Cover

I used a fine white pure cotton 4 ply and a 3mm hook you can use any yarn just adjust your hook size accordingly

Terms used

Ch=chain
Sl St = Slip stitch
Dc= double crochet
Htr=half treble
tr =treble

Foundation chain: Make 4ch, sl st into 1st ch to form a ring.

Round 1: ch1, 8dc into the ring, sl st into ch1

Round 2: ch2, 2htr into each st, sl st to ch2

Round 3:  ch2, *1htr into next st, 2htr into next st, rpt from * to end, sl st to 2ch

Round 4:  ch2, *1htr into next 2 st’s, 2htr into next st, rpt from * to end, sl st to 2ch 

Round 5: ch2, *1htr into next 3 st’s, 2htr into next st, rpt from * to end, sl st to 2ch

Round 6: ch2, * 1htr into next 4 st’s , 2htr into next st, rpt from * to end, sl st to 2ch

Round 7: ch2, * 1htr into next 5 st’s, 2htr into next st, rpt from * to end, sl st to 2ch

Round 8: ch2, *1htr into next 6 st’s, 2htr into next st, rpt from * to end, sl st to 2 ch

(Note at this point if your base is not big enough continue increasing by one st at the beginning of the round)

Round 9: ch2, * 1htr into the back loop only of each st rpt from * to end, sl st to 2 ch.

(Note that round 9 forms a lip which turns to form an edge around the base)

Round 10: 4chain *skip  a st, 1tr into next st, 1ch, rpt from * to end, sl st into 3rd chain of 4 chain

Round 11:  slip st into first ch sp, chain 4,* 1tr into next ch sp, 1ch, rpt from * to end , sl st into 3rd chain of 4 chain.

Round 12: repeat round 11.

Round 13: slip st into first ch sp, chain 3,* 1htr into next ch sp, 1ch, rpt from * to end , sl st into 2nd chain of 3 chain.

Round 14: 1ch, *1dc into each st, rpt from * to end, sl st into 1ch 

Secure thread and sew in ends.

This pattern can be adapted for any size jar using any yarn just adjust your hook size and increase/ decrease the number of rounds for your base and the row 11 repeats.

The base begins to form after round 2

Round 9 creates the lip for the turning ridge

Jar covered just needs ends sewing in and tea light adding
Click on our instagram link on the side of this page to see some lovely pictures of the holders with tea lights in them!!

Happy hooking, have a great week! 

Monday 25 May 2015

The Magnificent Sev(en)!

Hello! Do you remember the days when all your knitting patterns were in paper or book form kept in one place for you to browse whilst enjoying a cup of tea and trying to decide on your next project? I do and if I am honest still have lots of those paper patterns. 

However with fast moving technology and the internet being the place that most of us look to for inspiration for the next new project our patterns are now stored mainly on devices or in the 'ether' waiting to be dragged and dropped for us to use. I have patterns on my kindle, laptop and i pad and sometimes, if I am honest, I forget what I have downloaded in my pattern purchasing frenzies at midnight on Ravelry!

But there comes a day when you are glad you paid for that PDF at one in the morning and my moment came on holiday last year,it was amazing! 


Loop & Leaf - the shop just looked like a house from the outsidehttp://www.loopandleaf.com/ 


My husband and I were fortunate enough to do our dream road trip from San Francisco to Las Vegas, and we loved it!! As you can imagine as a knitter in a car, being a passenger most of the time, I had a few projects to complete along the way. When not knitting or crocheting I was looking at the next town we were due to arrive in and googling Yarn Stores, (just out of interest you understand). When we arrived in the beautiful Santa Barbara we were both ready to have a relaxing few days with a trip to the Zoo  being the one thing we really wanted to do. However a yarn store flashed on my radar, Loop and Leaf was it's name and it wasn't too far from our base, it would have been rude not to visit!


Behind the front door was an amazing display of yarns

 My ever patient husband took me along to the destination and I got out thinking we were in the wrong place, the yarn store looked just like a regular house, that is until you opened the door....Behind that door were the most amazing yarns and colours and it was all so beautifully displayed and then in another room was a large table with ladies working on projects, I felt like a child in a sweet shop, each way you turned there was just more and more to see. After some time of browsing and chatting with the store owner, who made me feel so welcome, I noticed it... a project which I had stored on my computer and emailed to my kindle so that I always had the pattern with me, but had never used in the 12 months (or maybe more that I had had it). The SEV(EN) Circle by Kirsten Johnstone ( http://www.ravelry.com/patterns/sources/kirsten-johnstones-ravelry-store) I immediately knew what my next project was and the yarn  which it was knitted in was so beautiful that I knew a purchase was about to be made. I had to contact the shop this week to find out what the yarn was and Celeste was prompt to reply to let me know that it was Sayonara by Schulana - 100% silk tape. This yarn is like nothing I have ever used and I recommend it so highly for this project and you only need to use one ball. I was sad to leave the yarn shop but eager to get back and cast on my cowl!!


My Beautiful Sev(en) cowl knitted in Sayonara Schulana

The pattern is so simple but ever so effective and it only takes one skein of yarn, because as Kirsten says in the pattern you can do as few or as many loops as you like. It is fabulous to give as a gift as it is so wearable I have it in different yarns and colourways and am always being asked where I got my beautiful cowl! 

If you are new to knitting in the round it is the perfect pattern to start on too and you can easily adapt it to knitting on straight needles if the round really does not suit you.
Knitted using Rowan Tetra Cotton

Knitted using a ball of aran cotton From my stash
The yarns I have made this in are all available in the UK although I would far rather visit Loop and Leaf again to get my silk yarn (in my dreams). If you do visit Santa Barbara I guarantee you will get a warm welcome. I would love a yarn store like this near to my house!

For a gift for someone special the silk is lovely and also comes in block colours (I used variegated yarn) it costs £15.95 per ball from http://www.loveknitting.com/schulana-sayonara-print

It also knits up beautifully in Rowan Tetra Cotton which is widely available  http://www.knitrowan.com/yarns/tetra-cotton RRP £6.50 per ball making it a great value gift to knit.

Well that's it for this time. We hope you have made the most of your Bank Holiday Weekend, we have to wait for August for the next one! Speak soon Helen & Sarah

Sunday 17 May 2015

Felting Workshop

Has anyone ever watched Pipkins a children's TV programme in the 1970's with Hartley Hare? It was my favourite kid's TV programme which I watched at my grans when I was growing up. So, when I saw Jenny Barnetts Hares at Yarndale last year I had to learn how to make them. So here is my day !!!

What an amazing afternoon I had at Jenny Barnetts felting Hare workshop at Castle Park Arts Centre, Frodsham. The arts centre is set in beautiful grounds, well worth a visit as there's lots of things to see and do.


I spent the afternoon with lovely friends Paula and Diane and a group of other amazing ladies making Hares. I am sharing with you the afternoon I had making my hare to show you how easy it is.
This was my finished hare, I love him!!

We were given a bag with everything inside to make the finished  hare from needle, beads, fibres, felting needles, sponge and more and this was ours to take home afterwards. We started by learning how to make the body and head by rolling and then using the felting needle to bond it together.


Then the ears and how to attach to the head.


You then gave your hare a face and  a personality !!


It was a fantastic day and here are the finished Hares.


If anyone would like to go on a workshops that Jenny runs then visit her website or facebook page.
or email her at:
 jennyneedlefelt@gmail .com

She also has a book out, which I bought, it is amazing with all the details on how to make other animals, tips and places to buy the materials.


Well Helen, I wish I could have been there, it sounds like a fantastic day, I love it when you come home carrying something you have made! The book looks great too! I am sure lot's of people would love to go on one of Jenny's courses, I can't wait to see your Hartley Hare, I was a big fan of Pipkins too!
Thank you for sharing your day.


Sunday 10 May 2015

Colour.. Our Favourite Thing!

We have been talking about what inspires us to use the colours which we do and the first thing that came to mind was the Sound of Music... stay with me..please, and Julie Andrews when she sang;

Raindrops on roses and whiskers on kittens
Bright copper kettles and warm woollen mittens
Brown paper packages tied up with strings
These are a few of my favourite things


Cream coloured ponies and crisp apple strudels
Doorbells and sleigh bells and schnitzel with noodles
Wild geese that fly with the moon on their wings
These are a few of my favourite things


Girls in white dresses with blue satin sashes
Snowflakes that stay on my nose and eyelashes
Silver white winters that melt into springs
These are a few of my favourite things

When the dog bites
When the bee stings
When I'm feeling sad
I simply remember my favourite things
And then I don't feel so bad


This explains perfectly how colours, textures and sounds all contribute to our moods, choices and general well being. 
Who has a background on their computer which is just lots of different balls of wool? I am sure there are lots of us, because just seeing a beautiful colour palette raises our spirits
.

Even odds and ends of stash make for a beautiful picture! 


So... we have decided not to dress like Julie Andrews and run through our local parks singing! Instead we are sharing some of the images which make us feel happy and also inspire our choices for colours.

A lovely floral display in Spain


Afternoon Tea - Hilton Manchester
A Cornish Sunset


Tatton Park flower show display
As creative people it is hard not to look at everyday objects without taking a colour or a design from them and playing around with it in your mind. We live in a world so full of colour but take a look at the majority of people on their way to work in the mornings, we tend to stick to a pallet of greys and black and white. Wearing bright colours can change not only the way you look but also the way you feel, lifting your mood and enhancing your natural pallet too. Why not start by having your colours done, Sarah had hers done by Susan, you can find her at http://www.susanstylesyou.com not only was it a fabulous and fun experience but it also helps when choosing yarn, avoiding expensive mistakes.

How can this stash not fail to inspire us
Self Colouring yarns..
 putting different tones of one colour together so beautifully

Play with colours in your stash to get a combination you love!
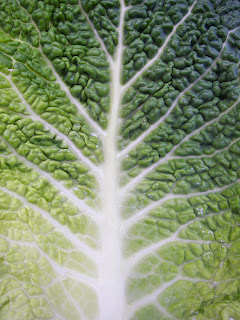
I think Sarah is still on the two for one Mojitos after singing with Julie Andrews, but I do agree, colour is everywhere. I sent my husband out to do the shopping and he came back with a very very large cabbage and all I could think was what a fantastic cushion design this would be, mad, yes, but you have to agree, amazing colour and design.


I do love working with bright colours and I am so lucky that I get to work with some amazing yarns. These are the new colours from Wendy - Peter pan DK, colours that I worked with a few months ago.


I made a baby blanket from these amazing colours.


A basic granny square design but because of the colours it works really well.


I just want to add a few pictures that I took in my Dads garden last year as I think the colours are amazing.


If you look around inspiration is everywhere, so take your camera out wherever you go as there's always a photo opportunity. Please share the photos that inspire you or are just beautiful colours, we would love to see them. 

You can share them on our Facebook page: Hank, Skein and Two Odd Balls - don't forget to LIKE our page!
Also take a look at us on Instagram HANK_SKEIN where you will get snippets of what we have been knitting/ crocheting. 
We would love to get lots of comments and feedback. So, don't be shy!!


Sunday 3 May 2015

Bags of Fun!

We have been working on designs for bags over the last few weeks and have both thoroughly enjoyed the challenge. When we met to discuss this project we said that it had to be stash that was used and we would work at least part of the project using squares made up like tension squares. We decided on cotton and gathered our stashes together and swapped colours with Helen opting for bright and Sarah going for more muted tones. Obviously we both work in very different ways so we took our yarn and headed off to think our respective designs through. What follows is each of us taking you through our thought and design processes:
We all have such a variety of colours in our stash! 

Sarah

I gathered up all my colours and as those of you who have read our previous posts know, I took a photo of the yarn on holiday with me to have a think. 

My Colours
My first thoughts were to do something which would be both practical and pretty but not too bulky. I knew that I wanted a simple design showing the beauty of knitting and purling and the great effects you can get from just using these basic stitches. I have always been a fan of the clutch bag and whilst on holiday I noticed that the majority of us were using ipads, from standard to minis, and that gave me the idea to do a simple clutch which could also double up as an attractive gadget carrier. I did numerous sketches and wrote my ideas down, I like to do this before I start knitting so I know where I am heading. I created the squares first using six different designs.

My Six squares ready for blocking

I knew I did not want all squares and wanted the main body of the bag to be a sturdy structure in a plain or striped pattern I actually mixed both because I had decided that my lining would be floral. 

The main body of the bag


Once the knitting and blocking was done the bag needed constructing....


I sewed the bag together and then cut the stiff interfacing to the measurements of the bag and cut the lining fabric leaving a seam allowance to allow a neat finish. I then sewed these pieces together and inserted them into the knitted bag. I placed magnetic clasps into position and then neatly hand stitched the two bags together. I am rather pleased with the end result. 
Definitely a bag I will use and a design which I hope you will want to reproduce. 
Read on to see Helens bag........... 


Helen

I chose out of our stash bright colours of blues and greens with a splash of orange. They were fun and summery and as soon as I started to play around with them I knew I needed to do a funky festival hippy chic bag with a hobo vibe.

I love crochet, I must say, even more than knitting. For me to start designing I have to begin by crocheting with the yarn for the ideas to start flowing. I decided to work in 2 different square patterns adding lots of colours into each one.
I worked 9 squares for the front and the same for the back.


The only problem I had was the amount of ends I had to sew in when I had finished.

After making all the squares and sewing the ends in I joined all 9 squares together to make the front panel and did the same for the back. I place wrong sides together and work a row of double crochet to join my squares.


I then placed the panels together and crocheted down the two side edges and across the bottom. I then needed to make a solid top so i used up the ends I had left to finish off the top  in rows of double crochet and made a crochet handle.


The only thing left to do now was to line the bag and its was finished. I am not good at sewing so Sarah helped me out.


 I hope you like the finished bag. 


I think you will agree that these two bags are great fun and easy to make and the best thing is it's out of our stash as well!! 
If you would like to make one or both of the bags, we are giving the patterns away. You just need to  email us at hankandskein@gmail.com to get the free patterns....we look forward to hearing from you and seeing your end results, why not post them on our face book page; Hank,Skein and two odd balls. 
Enjoy the rest of your Bank Holiday Weekend!

Helen & Sarah x